Tuesday, November 25, 2008

A Turkey Recipe for Thanksgiving

OK, while I am the GrillinFool this is not in fact a grilling recipe. But seeing how Thanksgiving is 2 days away I thought I would make an exception. After Thanksgiving I'm hoping to have a smoked Turkey done in a Big Green Egg posted but ahead of time I thought I would go ahead and post this recipe and it is incredibly simple...I have to give credit to Fool's Pappy for this one though as he was the one who turned me on to this recipe...

Lemon Rosemary Turkey

Ingredients:
1 whole Turkey - weight is dependent on how many servings are required.
Brine ingredients - salt, can of sprite, 2 whole apples, one onion, garlic, black pepper
1 large lemon, cut into halves.
3 sprigs of fresh rosemary - for larger turkeys you may want more rosemary but as this is a potent herb go at your own risk
salt and pepper to taste.
butter or olive oil, whichever you prefer (butter tastes better but the olive oil is healthier).

Brine the Turkey overnight in whatever brine recipe your prefer. In this case I used salt (obviously) 2 whole apple quartered, a can of sprite, a whole onion coarsely chopped, garlic and black pepper.

The following day, remove turkey from brine and rinse off the brine, cavity and all.

Heat oven to 350 degrees.

Gently separate the skin from the breast meat and slide the skin down to expose the turkey breasts.

Salt and pepper the breasts.

Place the lemon halves against the breast with the peel side out. This way the juice from the lemon will baste the breast as the Turkey bakes making a wonderfully intense lemon flavor. Slide the skin back over the lemons to hold them in place.


Remove the rosemary leaves from the stem if the stem is woody at all and coarsely chop the rosemary.

Combine the rosemary with melted butter or olive oil

Rub butter or oil rosemary mixture over the skin of the entire Turkey until it is completely coated

Pepper the outside of the skin (no need for salt due to the brine)

Cover and place in oven for 30-45 minutes.

Remove cover and continue to roast until juices run clear, basting every 15-20 minutes depending on the size of the bird.

If you've followed these steps correctly your Turkey should look like this
:


HAPPY THANKSGIVING EVERYONE!!!!


Click here for the rest of the process

Monday, November 24, 2008

Guy Night at the GrillinFool's Part III


Crostinis are an original recipe from the GrillinFool. What the heck is a crostini? Basically it's toasted bread but in this case I do the toasting on the grill and add a bunch of other things for flavor.

Start with any baguette or loaf of bakery bread - Sweet Mini Loaves, Sourdough, French, etc. Just make sure it is soft sided bread. If it's hard sided it's gonna have the consistency of a hockey puck.

Take the bread and cut 1 inch thick slices on the bias to increase the surface area. Here is a loaf of Sourdough French that I cut cut into 6 slices sitting next to a small plate that has about a quarter cup of olive oil sitting on it:


Each slice of bread needs to be dredged in the oil to keep the bread from burning right away. Both sides need to be oiled. One side:


And then the other:

Here we have half of the bread oiled:


You get the idea...You will invariably have to pour more oil on the plate at least a couple of times because the bread soaks it up like a sponge

Once they are all oiled a couple cracks of fresh black pepper on each:


From here we add the basil to all of these. Be generous:


Now we add a spoonful of minced garlic to each. Yeah, I said it, a full spoonful. It will make sense in a second why this isn't just plain nuts!?!


That seems like a whole lotta garlic, and it is. But before I show why it's not nuts, take the back of a spoon and push the garlic into the bread. Don't mash it, just push it in with some pressure from the back of the spoon:


Now for the final ingredient for the topping. Grate some sort of hard cheese like Parmesian, Asiago, Romano, etc. You need enough to cover the tops thickly of all 6 slices of bread but leave this to the side. It goes on last. Oh, and that pregrated crap in the green can will not work for this. And considering how long hard cheese lasts in a ziplock in the fridge, I am really surprised why people bother with the stuff in the can.


OK, now on to the cooking process. These are not something you can throw on the grill and forget about. The bad news is they have to be watched the entire time they are over the heat. The good news is that they are only over the heat a couple of minutes. If you walk away for more than a minute you will be starting over.

Now that we have that out of the way, drop them directly over the coals:


Keep checking them every few seconds and rotate as necessary to cook them evenly. Once they are toasted flip them as necessary. Don't wait for all of them to toast evenly before flipping them:


This is the reason it's not nuts to put that much garlic on the crostinis. A lot of the garlic will fall into the fire when flipped. Once they have been flipped look for the garlic to brown and the endges of the crust to brown as well. When that happens pull them off to the side to the section of the grill without any heat (in this case next to my steaks that are staying warm during this process) and cover the tops with the grated cheese.


Once you cover the tops with the cheese, put the lid on the grill and melt the cheese. Normally we do these as an appetizer but tonight we decided that we would have them with the meal itself.

If cooking these for a large group, I do not recommend doing more than eight at a time in order to keep from burning them. 8 doesn't sound like much, but if you cut them in half when they are done you have 16 to hand out to people.

These look much more appetizing if the lighting was better, but considering we corked this just before serving the food, my limited photography skills were in the tank by this point


The finished product:


Considering the poor quality of the pics of the crostinis from guy night, I thought I would include some pics of some crostinis I did last summer in Michigan. Here they are over the heat toasting on the bottom:


And here we have some toasting the top and some covered in cheese that will be melted once the ones on the left are done, slathered with cheese and pulled over to the side with no heat:


Click here for the rest of the process

Guy Night at the GrillinFool's Part II


One of my favorite things to grill. So simple, so easy and always good. I got these monsters at Sam's. You'll get an idea of the size in a minute.

Really all scallops need are salt and black pepper and to be seared on each side. As long as you don't overcook them they will be awesome. If they are rubbery they are overcooked.

I tweak grilled scallops only a couple of ways, wrapping bacon around them, slathering some garlic infused olive oil on them or soaking them in Andria's for a bit. I promise that I am not a schill for Andria's despite how much I pimp their stuff here. In this case I did marinade them in Andria's for about 30 minutes:


But I don't want to get ahead of myself. I almost left out a step. Scallops have a tough muscle that attaches the tender delicious part to the shell. This membrane needs to be removed. Some scallops have this still attached. For some it fell off during harvesting. Three of the six I cooked at the membrane. Here is a picture of the membrane:


That pic should also give you an idea about how big these scallops were. Here is a short clip of how to remove the membrane:


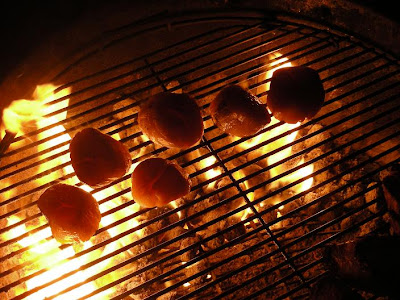
Normally I just sear them over a hot fire but the cold and the wind were working against me and wicking the heat away so I flame seared these like I did the steaks:


This darkened the scallops more than I normally do when I have a hotter fire but they were delicious none the less


Part III will be my crostinis.
Click here for the rest of the process

Guy Night at the GrillinFool's Part I

So, last Saturday, my son's 7 month birthday we did Guy Night at the GrillinFool's. For years guy night was just my dad and I. We would do this a few nights of the year. Steaks bigger than your foot, a good bottle of red (or two) and a guy flick - doesn't have to have a lot of plot but it needs to have some explosions and gun battles and maybe some nudity!?!?

Well, this guy night included my father - Fools Pappy on this site:


As well as my FiL and my son - Future Pitmaster: GrillinFool Jr.


I prepared quite the meal and took a ton of pictures so I am going to break it down into 3 posts. I did Filets, Scallops and Crostinis. I'll go into each in depth in their own post. Here are the finished products. Plated:


The closeup of the steak:


The Scallops:


The Crostinis:


First things first. Gotta get a proper beverage to imbibe while preparing the meal. This Schild Estate Barrossa Shiraz should do nicely:


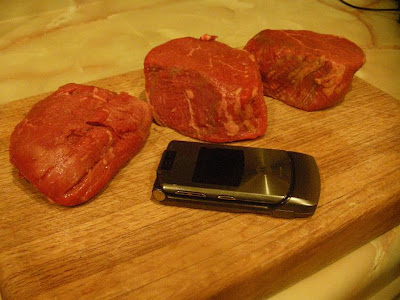
The steaks were my typical deal, marinade, sear, bake, rest, slice. Take a look at these bad boys (cell phone for reference to size).


The Marinade was Andria's, red wine, olive oil, black pepper and garlic in a ziplock bag overnight:


Pulled them out of the marinade, patted them dry and sprinkled coarse salt and black pepper and let them come up to room temp. Never put a cold steak on the grill:


Seared over open flames:


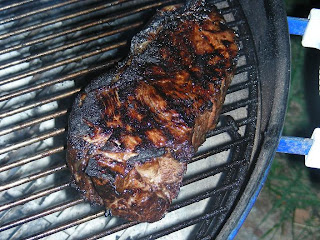
After the searing pull the steaks off to the side:


And of course the money shot of my steak:


Part II will be the scallops and Part III will be the Crostinis
Click here for the rest of the process

Saturday, November 22, 2008

Another Beautifully Done Steak


I went to the butcher at my local grocery store and asked the kid behind the counter to cut me a 2 inch thick New York Strip (NYS). And he hands me this:


Something looks a bit off. 2 inches? This isn't a steak, it's a roast. Where's that tape measure?


OK, so it's 3.5 inches thick. Part of me wants to grill it as is. A big part of me. But in the end I decided on going with my original idea of a 2 inch steak and sliced that hunk in two.


I marinaded that bad boy in Andria's, Worcestershire, garlic, black pepper and a little coke. I pulled it out of the fridge about an hour before I planned to cook it so it could come up to room temperature. Right before I put it on the grill I sprinkled some coarse salt on it and some more fresh cracked black pepper.

Now I need a proper beverage to have with this magnificent steak. I think a Marquis Phillips Sarah's Blend Shiraz will suffice.


Now that I was properly imbibing its back to the grillin. Funny how those two things go so well together. Is that what they mean by grillin and chillin?

As always when I do steaks I let them come up to room temperature before I put them on the grill and then I do two zone grilling - Coals on one side, nothing on the other.

Now it's time to sear in those juices. I don't mess around with this. There is only one way to sear those juices in properly and that's with a wicked hot fire and some direct scorching from an open flame. Simply dribble a little veggie oil over the white hot coals

***Disclaimer - I do not recommend doing this near siding, a wood deck or anything else that could melt or catch on fire. Also avoid doing this in high wind.

One trick, if the fire isn't quite hot enough to ignite the oil, drop a piece of newspaper in between the grill grate. The paper has a much lower smoke point than oil, so once it ignites, pour some oil near it, not right on top as you may put the fire out, and you have a nice flame.

Now that I have a nice flame going time to sear in those juices. I drop that huge chunk of meat right in the middle of the flames.


Here is the steak nicely seared on each side and off to the side to bake a little.


Don't be afraid to let that steak char a bit around the edges. That steak is perfectly seared and right now very rare. I prefer the steak between rare and medium rare so I am going to bake this on the other side of the grill with no coals for only a couple minutes with the lid on and the vents closed. Closing the vents will keep the heat in better and start to put the fire out. One of the beautiful things about a Weber is that it seals so tightly that it will put the coals out and they can be reused in future grill sessions.

I let this bad boy rest about 4 minutes considering the thickness. Then I plated it, and sliced it. So here's the money shot.


And of course a closeup of the money shot


That steak was absolutely delicious....
Click here for the rest of the process

Friday, November 21, 2008

Spiral Sliced and Stuffed Pork Loin


I didn't want to do two loins in a row, but I found this when I was digging through some old pics.

I took a pork loin, marinaded it in Andria's, garlic, red wine and black pepper. Then I rinsed off the marinade the following day and spiral sliced the loin until it laid flat.


Basically keep the slice about 1 inch thick and keep rotating the meat forming a spiral. Eventually the loin will lay flat like this:


Once the meat is laid flat, I covered the loin with slices of sandwich size pepperoni.


After that I made up a mixture of white cheddar, grated asiago, a little cream cheese, minced garlic and onion, and black pepper and spread that over the pepperoni.


Then I tied it all up with cooking twine. Don't tie too tight. Allow some room for the cheese to expand when it gets good and hot.


I put it on the smoker at about 200-225. It was a cold and windy night so keeping the temp up was a little tough.

2.5 hours in with some of the extra pepperoni on top to baste and to eat once it gets crispy. I'll tell you that smoked pepperoni was amazing. There is a fatty on the upper grill rack


You can see that the cheese is oozing out a bit and is getting close to being done. In the future I recommend putting a sheet of tin foil underneath after about an hour to keep the cheese from falling through the grill grate. There is just no way to keep the cheese from oozing out of this thing.

It was done about 3.5 hours in, but the wife was getting a little chatty with her mom inside and forgot to put the macaroni in. I pushed it off to the side to keep warm for another 30 minutes.

I let it rest for about 10 minutes. If I hadn't spiral sliced it I would've let it rest longer. Here it is resting along with the fatty I did as well.


Sliced and plated


Click here for the rest of the process